添加依赖 1 2 3 4 5 6 7 8 9 10 11 12 13 14 15 16 17 18 19 20 21 22 23 24 25 26 27 28 29 30 31 32 33 34 35 36 37 <!-- mp--> <dependency> <groupId>com.baomidou</groupId> <artifactId>mybatis-plus-boot-starter</artifactId> <version>3.4.2</version> </dependency> <!-- 代码生成器--> <dependency> <groupId>com.baomidou</groupId> <artifactId>mybatis-plus-generator</artifactId> <version>3.4.0</version> </dependency> <!-- 模板引擎--> <dependency> <groupId>org.freemarker</groupId> <artifactId>freemarker</artifactId> <version>2.3.31</version> </dependency> <!-- 热部署插件--> <dependency> <groupId>org.springframework.boot</groupId> <artifactId>spring-boot-devtools</artifactId> <scope>runtime</scope> <optional>true</optional> </dependency> <!-- mysql driver--> <dependency> <groupId>mysql</groupId> <artifactId>mysql-connector-java</artifactId> <scope>runtime</scope> </dependency> <!-- 简化代码的工具--> <dependency> <groupId>org.projectlombok</groupId> <artifactId>lombok</artifactId> <optional>true</optional> </dependency>
编写配置文件 当application.yml 和 application.properties 两个文件同时存在的时候,application.properties的优先级是高于application.yml的。
但是由于propertie的配置文件含中文时读取会乱码,而在yml中不会。故选用yml
application.yml:
1 2 3 4 5 6 7 8 9 10 spring: datasource: driver-class-name: com.mysql.cj.jdbc.Driver url: jdbc:mysql://mysql:3306/blog?useUnicode=true&useSSL=false&characterEncoding=utf8&serverTimezone=Asia/Shanghai username: root password: admin mybatis-plus: mapper-locations: classpath*:/mapper/**Mapper.xml configuration: log-impl: org.apache.ibatis.logging.stdout.StdOutImpl #控制台打印完整带参数SQL语句
上面除了配置数据库的信息,还配置了myabtis plus的mapper的xml文件的扫描路径。
新建MybatisPlusConfig 开启mapper接口扫描,添加分页插件PaginationInterceptor。
1 2 3 4 5 6 7 8 9 10 11 12 13 14 15 16 17 18 19 20 21 22 23 24 25 26 27 import com.baomidou.mybatisplus.annotation.DbType; import com.baomidou.mybatisplus.extension.plugins.MybatisPlusInterceptor; import com.baomidou.mybatisplus.extension.plugins.inner.PaginationInnerInterceptor; import org.springframework.context.annotation.Bean; public class MybatisPlusConfig { /*// 旧版 @Bean public PaginationInterceptor paginationInterceptor() { PaginationInterceptor paginationInterceptor = new PaginationInterceptor(); // 设置请求的页面大于最大页后操作, true调回到首页,false 继续请求 默认false // paginationInterceptor.setOverflow(false); // 设置最大单页限制数量,默认 500 条,-1 不受限制 // paginationInterceptor.setLimit(500); // 开启 count 的 join 优化,只针对部分 left join paginationInterceptor.setCountSqlParser(new JsqlParserCountOptimize(true)); return paginationInterceptor; }*/ // 最新版 @Bean public MybatisPlusInterceptor mybatisPlusInterceptor() { MybatisPlusInterceptor interceptor = new MybatisPlusInterceptor(); interceptor.addInnerInterceptor(new PaginationInnerInterceptor(DbType.MYSQL)); return interceptor; } }
代码生成 官方给我们提供了一个代码生成器,然后我们写上自己的参数之后,就可以直接根据数据库表信息生成entity、service、mapper等接口和实现类。(使用plus不就是为了偷懒嘛··)
从mybatis plus官网捞个代码生成器CodeGenerator,然后根据自己的项目改一下配置即可:
1 2 3 4 5 6 7 8 9 10 11 12 13 14 15 16 17 18 19 20 21 22 23 24 25 26 27 28 29 30 31 32 33 34 35 36 37 38 39 40 41 42 43 44 45 46 47 48 49 50 51 52 53 54 55 56 57 58 59 60 61 62 63 64 65 66 67 68 69 70 71 72 73 74 75 76 77 78 79 80 81 82 83 84 85 86 87 88 89 90 91 92 93 94 95 96 97 98 99 100 101 102 103 104 105 106 107 108 109 110 111 112 113 114 115 package com.xiaoniu.blog; import com.baomidou.mybatisplus.core.exceptions.MybatisPlusException; import com.baomidou.mybatisplus.core.toolkit.StringPool; import com.baomidou.mybatisplus.core.toolkit.StringUtils; import com.baomidou.mybatisplus.generator.AutoGenerator; import com.baomidou.mybatisplus.generator.InjectionConfig; import com.baomidou.mybatisplus.generator.config.*; import com.baomidou.mybatisplus.generator.config.po.TableInfo; import com.baomidou.mybatisplus.generator.config.rules.NamingStrategy; import com.baomidou.mybatisplus.generator.engine.FreemarkerTemplateEngine; import java.util.ArrayList; import java.util.List; import java.util.Scanner; // 演示例子,执行 main 方法控制台输入模块表名回车自动生成对应项目目录中 public class CodeGenerator { /** * <p> * 读取控制台内容 * </p> */ public static String scanner(String tip) { Scanner scanner = new Scanner(System.in); StringBuilder help = new StringBuilder(); help.append("请输入" + tip + ":"); System.out.println(help.toString()); if (scanner.hasNext()) { String ipt = scanner.next(); if (StringUtils.isNotBlank(ipt)) { return ipt; } } throw new MybatisPlusException("请输入正确的" + tip + "!"); } public static void main(String[] args) { // 代码生成器 AutoGenerator mpg = new AutoGenerator(); // 全局配置 GlobalConfig gc = new GlobalConfig(); String projectPath = System.getProperty("user.dir"); gc.setOutputDir(projectPath + "/src/main/java"); gc.setAuthor("关注公众号:小牛呼噜噜"); gc.setOpen(false); // gc.setSwagger2(true); 实体属性 Swagger2 注解 gc.setServiceName("%sService"); mpg.setGlobalConfig(gc); // 数据源配置 DataSourceConfig dsc = new DataSourceConfig(); dsc.setUrl("jdbc:mysql://121.5.225.106:3306/blog?useUnicode=true&useSSL=false&characterEncoding=utf8&serverTimezone=UTC"); // dsc.setSchemaName("public"); dsc.setDriverName("com.mysql.cj.jdbc.Driver"); dsc.setUsername("root"); dsc.setPassword("Zj@123456."); mpg.setDataSource(dsc); // 包配置 PackageConfig pc = new PackageConfig(); pc.setModuleName(null);//模块名 pc.setParent("com.xiaoniu.blog");//包名 mpg.setPackageInfo(pc); // 自定义配置 InjectionConfig cfg = new InjectionConfig() { @Override public void initMap() { // to do nothing } }; // 如果模板引擎是 freemarker String templatePath = "/templates/mapper.xml.ftl"; // 如果模板引擎是 velocity // String templatePath = "/templates/mapper.xml.vm"; // 自定义输出配置 List<FileOutConfig> focList = new ArrayList<>(); // 自定义配置会被优先输出 focList.add(new FileOutConfig(templatePath) { @Override public String outputFile(TableInfo tableInfo) { // 自定义输出文件名 , 如果你 Entity 设置了前后缀、此处注意 xml 的名称会跟着发生变化!! return projectPath + "/src/main/resources/mapper/" + "/" + tableInfo.getEntityName() + "Mapper" + StringPool.DOT_XML; } }); cfg.setFileOutConfigList(focList); mpg.setCfg(cfg); // 配置模板 TemplateConfig templateConfig = new TemplateConfig(); templateConfig.setXml(null); mpg.setTemplate(templateConfig); // 策略配置 StrategyConfig strategy = new StrategyConfig(); strategy.setNaming(NamingStrategy.underline_to_camel); strategy.setColumnNaming(NamingStrategy.underline_to_camel); strategy.setEntityLombokModel(true); strategy.setRestControllerStyle(true); strategy.setInclude(scanner("表名,多个英文逗号分割").split(",")); strategy.setControllerMappingHyphenStyle(true); //自定义 // strategy.setTablePrefix("m_"); mpg.setStrategy(strategy); mpg.setTemplateEngine(new FreemarkerTemplateEngine()); mpg.execute(); } }
然后我们数据库中新建了一个user表:(注意 编码是 utf8mb4)
1 2 3 4 5 6 7 8 9 10 11 12 13 14 15 16 CREATE TABLE `user` ( `user_id` bigint(100) NOT NULL COMMENT '用户id(主键,雪花算法)', `username` varchar(255) DEFAULT NULL COMMENT '用户名', `avatar` varchar(255) DEFAULT NULL COMMENT '用户头像', `email` varchar(255) DEFAULT NULL COMMENT '用户邮箱', `nickname` varchar(255) DEFAULT NULL COMMENT '昵称', `password` varchar(255) DEFAULT NULL COMMENT '密码(游客不需要密码)', `role` int(10) DEFAULT NULL COMMENT '用户权限(0 admin; 1 普通用户; 2 游客)', `create_time` datetime(6) DEFAULT NULL COMMENT '创建时间', `update_time` datetime(6) DEFAULT NULL COMMENT '修改时间', `last_login_time` datetime(6) DEFAULT NULL COMMENT '上次登陆时间', `login_time` datetime(6) DEFAULT NULL COMMENT '当前登陆时间', `status` int(10) DEFAULT NULL COMMENT '用户状态(10正常,20挂起,30注销,40锁定)', `delete_sign` int(10) DEFAULT NULL COMMENT '删除标志(0未删除,1已删除', PRIMARY KEY (`user_id`) ) ENGINE=InnoDB DEFAULT CHARSET=utf8mb4;
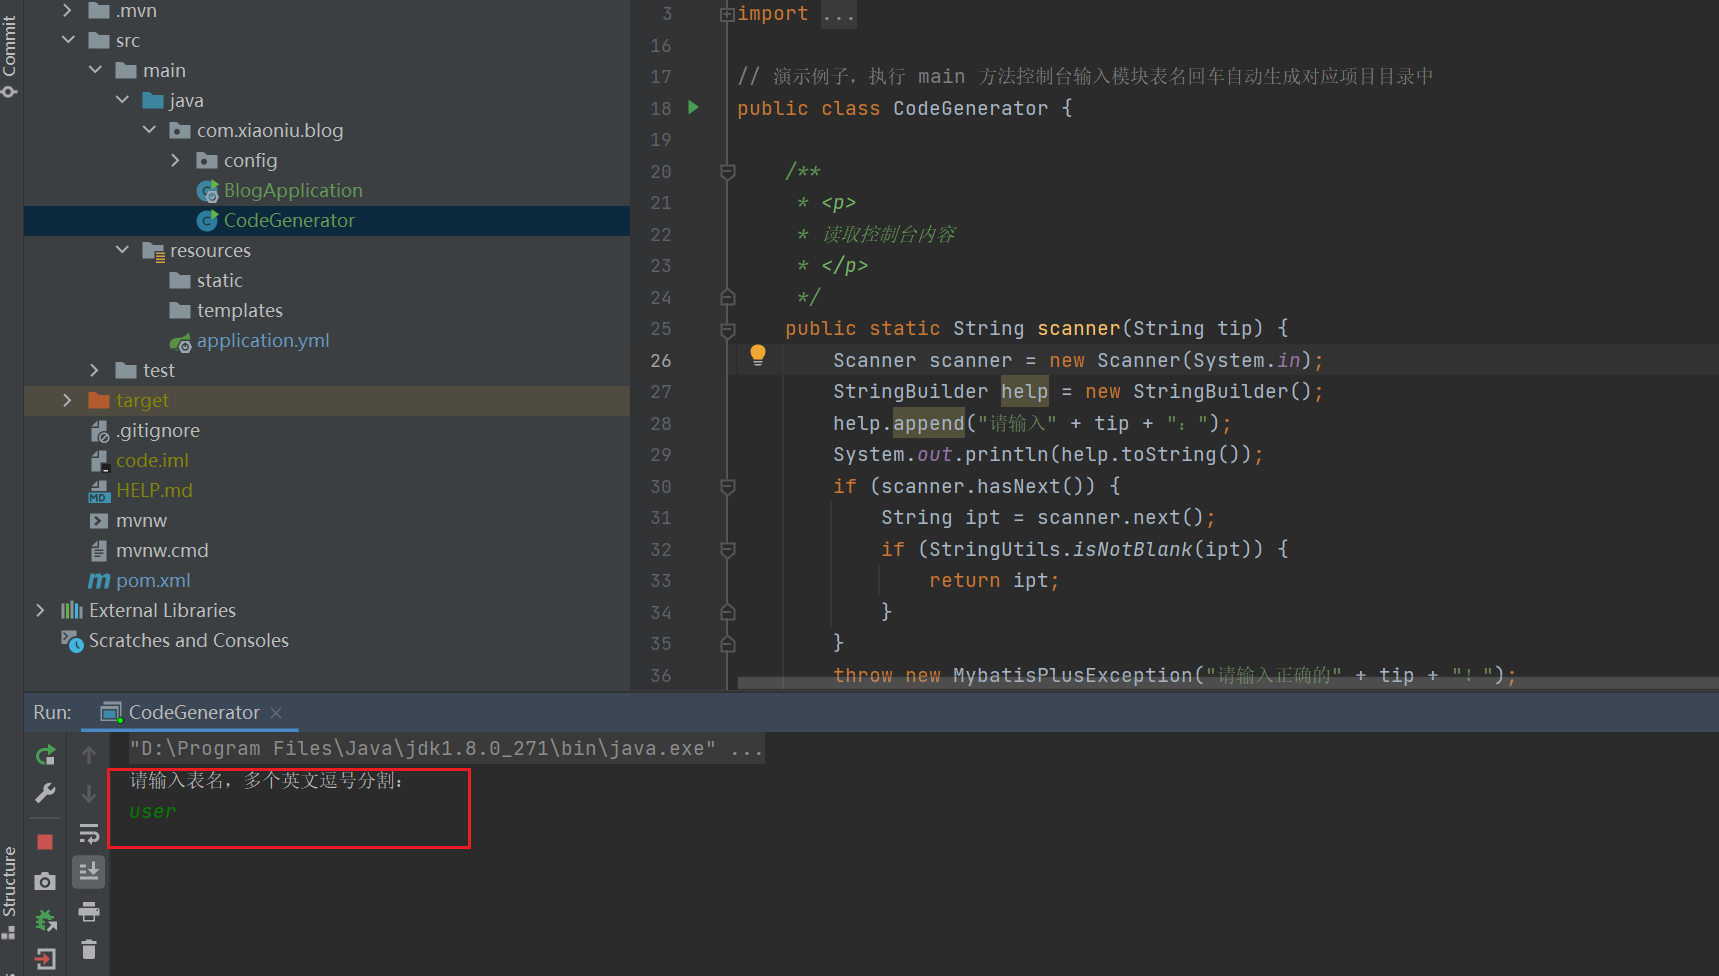
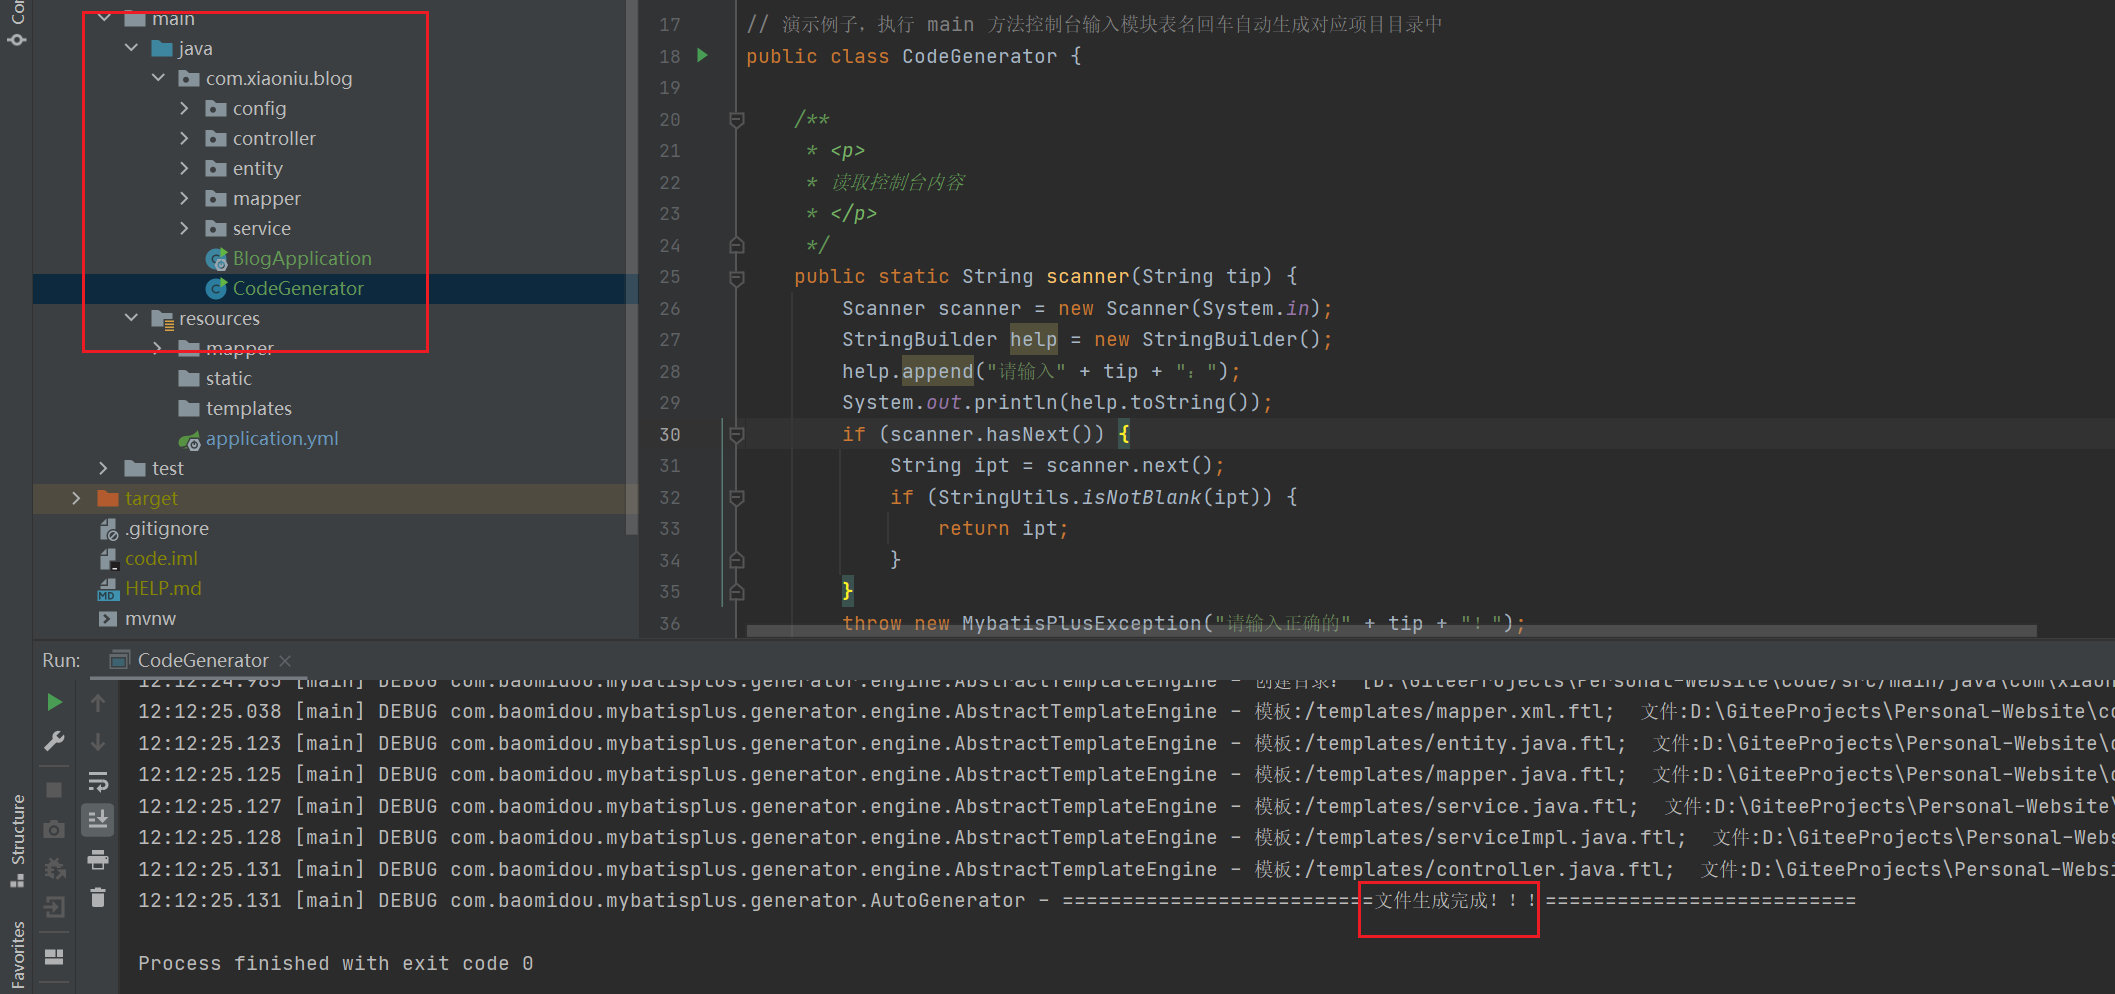
最后运行CodeGenerator的main方法,输入表名:m_user,生成结果如下:
结果:
#写一个测试方法
首先往数据库表中,手动插入一条记录
编写controller方法
1 2 3 4 5 6 7 8 9 10 11 12 13 14 15 16 17 18 19 20 21 22 @RestController @RequestMapping("/user") public class UserController { @Autowired UserService userService; @Autowired private UserMapper userMapper; @GetMapping("/{id}") public Object test(@PathVariable("id") Long id) { QueryWrapper<User> queryWrapper = new QueryWrapper<>(); queryWrapper.eq("user_id",id); User user = userMapper.selectOne(queryWrapper); System.out.println(user); return user; } }
启动项目,报错:
Error creating bean with name ‘userServiceImpl’: Unsatisfied dependency expressed through field
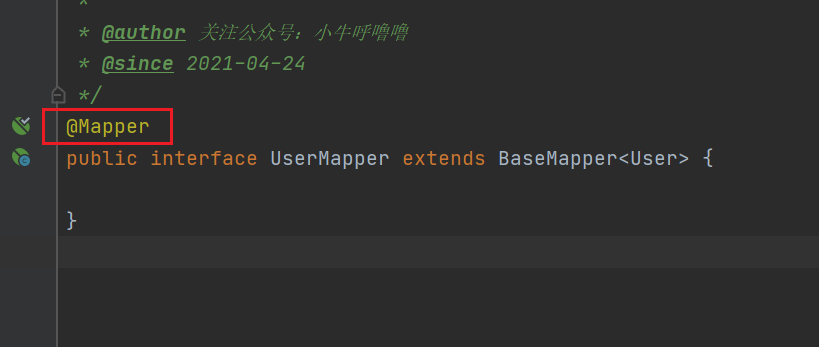
小牛检查发现,自动生成的mapper文件里,缺少一个注解@Mapper,补上即可(不知道,是不是我代码生成器 哪里配错了,毕竟第一次用MP,如果有人知道留言提醒我一下)
运行结果:
本篇文章到这里就结束啦,如果喜欢的话,多多支持,欢迎关注!
参考:https://baomidou.com/guide/quick-start.html