原来还能这样看Java线程的状态及转换

image-20221219203605742

作者:小牛呼噜噜 | https://xiaoniuhululu.com
计算机内功、JAVA底层、面试、职业成长相关资料等更多精彩文章在公众号「小牛呼噜噜

大家好,我是呼噜噜,博主还没羊,最近一直在梳理Java并发,但内容杂且偏晦涩,今天我们一起来聊聊Java 线程的状态及转换 先来夯实一下基础,万丈高楼平地起,路还是得慢慢走。

Java线程的生命周期

我们先来看下Java线程的生命周期图:

image-20221219203605742

上图也是本文的大纲,我们下面依次聊聊java各个线程状态及其他们的转换。

线程初始状态

线程初始状态(NEW): 当前线程处于线程被创建出来但没有被调用start()

在Java线程的时间中,关于线程的一切的起点是从Thread 类的对象的创建开始,一般实现Runnable接口 或者 继承Thread类的类,实例化一个对象出来,线程就进入了初始状态

1
Thread thread = new Thread()

由于线程在我们操作系统中也是非常宝贵的资源,在实际开发中,我们常常用线程池来重复利用现有的线程来执行任务,避免多次创建和销毁线程,从而降低创建和销毁线程过程中的代价。Java 给我们提供了 Executor 接口来使用线程池,查看其JDK1.8源码,发现其内部封装了Thread t = new Thread()

1
2
3
4
5
6
7
8
9
10
11
12
13
14
15
16
17
18
19
20
21
22
23
public class Executors {
...
static class DefaultThreadFactory implements ThreadFactory {
private static final AtomicInteger poolNumber = new AtomicInteger(1);
private final ThreadGroup group;
private final AtomicInteger threadNumber = new AtomicInteger(1);
private final String namePrefix;

...

public Thread newThread(Runnable r) {
Thread t = new Thread(group, r,
namePrefix + threadNumber.getAndIncrement(),
0);
if (t.isDaemon())
t.setDaemon(false);
if (t.getPriority() != Thread.NORM_PRIORITY)
t.setPriority(Thread.NORM_PRIORITY);
return t;
}
}
...
}

在thread类源码中,我们还能发现线程状态的枚举类State

1
2
3
4
5
6
7
8
9
10
11
12
13
14
15
16
17
18
19
20
public enum State {
/**
* Thread state for a thread which has not yet started.
*/
NEW,

RUNNABLE,

BLOCKED,

WAITING,

TIMED_WAITING,

/**
* Thread state for a terminated thread.
* The thread has completed execution.
*/
TERMINATED;
}

所谓线程的状态,在java源码中都是通过threadStatus的值来表示的

1
2
3
4
5
/* Java thread status for tools,
* initialized to indicate thread 'not yet started'
*/

private volatile int threadStatus = 0;

StatethreadStatus 通过toThreadState方法映射转换

1
2
3
4
5
6
7
8
9
10
11
12
13
14
15
16
17
18
19
20
21
22
    public State getState() {
// get current thread state
return sun.misc.VM.toThreadState(threadStatus);
}

//--- --- ---

public static State toThreadState(int var0) {
if ((var0 & 4) != 0) {
return State.RUNNABLE;
} else if ((var0 & 1024) != 0) {
return State.BLOCKED;
} else if ((var0 & 16) != 0) {
return State.WAITING;
} else if ((var0 & 32) != 0) {
return State.TIMED_WAITING;
} else if ((var0 & 2) != 0) {
return State.TERMINATED;
} else {
return (var0 & 1) == 0 ? State.NEW : State.RUNNABLE;
}
}

到这里我们就可以发现,Thread t = new Thread()在Java中只是设置了线程的状态,操作系统中并没有的实际线程的创建

线程运行状态

线程运行状态(RUNNABLE),线程被调用了start()等待运行的状态

在Linux操作系统层面,包含RunningReady 状态。其中Ready状态是等待 CPU 时间片。现今主流的JVM,比如hotspot虚拟机都是把Java 线程,映射到操作系统OS底层的线程上,把调度委托给了操作系统。而操作系统比如Linux,它是多任务操作系统,充分利用CPU的高性能,将CPU的时间分片,让单个CPU实现”同时执行”多任务的效果。

Linux的任务调度又采用抢占式轮转调度,我们不考虑特权进程的话OS会选择在CPU上占用的时间最少进程,优先在cpu上分配资源,其对应的线程去执行任务,尽可能地维护任务调度公平。RunningReady 状态的线程在CPU中切换状态非常短暂。大概只有 0.01 秒这一量级,区分开来意义不大,java将这2个状态统一用RUNNABLE来表示

thread.start()源码解析

我们接下来看看为什么说执行thread.start()后,线程的才”真正的创建”

1
2
3
4
5
6
7
8
9
10
11
12
13
14
15
public class ThreadTest {
/**
* 继承Thread类
*/
public static class MyThread extends Thread {
@Override
public void run() {
System.out.println("This is child thread");
}
}
public static void main(String[] args) {
MyThread thread = new MyThread();
thread.start();
}
}

其中thread.start()方法的源码中,会去调用start0()方法,而start0()private native void start0();JVM调用Native方法的话,会进入到不受JVM控制的世界里

Thread类实例化的同时,会首先调用registerNatives方法,注册本地Native方法,动态绑定JVM方法

1
2
3
4
private static native void registerNatives();
static {
registerNatives();
}

Thread类中通过registerNatives将指定的本地方法绑定到指定函数,比如start0本地方法绑定到JVM_StartThread函数:

1
2
3
4
5
6
...
static JNINativeMethod methods[] = {
{"start0", "()V", (void *)&JVM_StartThread},
{"stop0", "(" OBJ ")V", (void *)&JVM_StopThread},
{"isAlive", "()Z", (void *)&JVM_IsThreadAlive},
...

源码见:http://hg.openjdk.java.net/jdk8u/jdk8u60/jdk/file/935758609767/src/share/native/java/lang/Thread.c

JVM_StartThread 是JVM层函数,抛去各种情况的处理,主要是通过 new JavaThread(&thread_entry, sz)来创建JVM线程对象

1
2
3
4
5
6
7
8
9
10
11
12
13
14
15
16
17
18
19
20
21
22
23
24
25
26
27
28
29
30
31
32
33
34
35
36

JVM_ENTRY(void, JVM_StartThread(JNIEnv* env, jobject jthread))
JVMWrapper("JVM_StartThread");
JavaThread *native_thread = NULL;

//表示是否有异常,当抛出异常时需要获取Heap_lock。
bool throw_illegal_thread_state = false;

// 在发布jvmti事件之前,必须释放Threads_lock
// in Thread::start.
{
// 获取 Threads_lock锁
MutexLocker mu(Threads_lock);


if (java_lang_Thread::thread(JNIHandles::resolve_non_null(jthread)) != NULL) {
throw_illegal_thread_state = true;
} else {
// We could also check the stillborn flag to see if this thread was already stopped, but
// for historical reasons we let the thread detect that itself when it starts running

jlong size =
java_lang_Thread::stackSize(JNIHandles::resolve_non_null(jthread));

// 创建JVM线程(用JavaThread对象表示)
size_t sz = size > 0 ? (size_t) size : 0;
native_thread = new JavaThread(&thread_entry, sz);
...
}
}

...

Thread::start(native_thread);//启动内核线程

JVM_END

源码见:https://hg.openjdk.java.net/jdk8u/jdk8u/hotspot/file/69087d08d473/src/share/vm/prims/jvm.cpp

我们再来看看JavaThread的实现,发现内部通过 os::create_thread(this, thr_type, stack_sz);来调用不同操作系统的创建线程方法创建线程。

1
2
3
4
5
6
7
8
9
10
11
12
13
14
15
16
17
18
19
20
21
JavaThread::JavaThread(ThreadFunction entry_point, size_t stack_sz) :
Thread()
#if INCLUDE_ALL_GCS
, _satb_mark_queue(&_satb_mark_queue_set),
_dirty_card_queue(&_dirty_card_queue_set)
#endif // INCLUDE_ALL_GCS
{
if (TraceThreadEvents) {
tty->print_cr("creating thread %p", this);
}
initialize();
_jni_attach_state = _not_attaching_via_jni;
set_entry_point(entry_point);
// Create the native thread itself.
// %note runtime_23
os::ThreadType thr_type = os::java_thread;
thr_type = entry_point == &compiler_thread_entry ? os::compiler_thread :
os::java_thread;
os::create_thread(this, thr_type, stack_sz);//调用不同操作系统的创建线程方法创建线程

}

源码见:https://hg.openjdk.java.net/jdk8u/jdk8u/hotspot/file/69087d08d473/src/share/vm/runtime/thread.cpp

我们都知道Java是跨平台的,但是native各种方法底层c/c++代码对各平台都需要有对应的兼容,我们这边以linux为例,其他平台就大家自行去查阅了

1
2
3
4
5
6
7
8
9
10
11
12
13
14
15
16
17
18
19
20
21
22
23
24
25
26
27
28
29
30
31
32
33
34
35
36
37
38
39
40
41
42
43
44
45
46
47
48
49
50
51
52
53
54
55
56
57
58
59
60
61
62
63
64
65
66
67
68
69
70
71
72
73
74
75
76
77
78
79
80
81
82
83
84
85
86
87
88
89
90
91
92
93
94
95
96
97
98
99
100
101
102
103
104
105
106
107
108
109
110
111
112
113
114
bool os::create_thread(Thread* thread, ThreadType thr_type, size_t stack_size) {
assert(thread->osthread() == NULL, "caller responsible");

// Allocate the OSThread object
OSThread* osthread = new OSThread(NULL, NULL);
if (osthread == NULL) {
return false;
}

// set the correct thread state
osthread->set_thread_type(thr_type);

// Initial state is ALLOCATED but not INITIALIZED
osthread->set_state(ALLOCATED);

thread->set_osthread(osthread);

// init thread attributes
pthread_attr_t attr;
pthread_attr_init(&attr);
pthread_attr_setdetachstate(&attr, PTHREAD_CREATE_DETACHED);

// stack size
if (os::Linux::supports_variable_stack_size()) {
// calculate stack size if it's not specified by caller
if (stack_size == 0) {
stack_size = os::Linux::default_stack_size(thr_type);

switch (thr_type) {
case os::java_thread:
// Java threads use ThreadStackSize which default value can be
// changed with the flag -Xss
assert (JavaThread::stack_size_at_create() > 0, "this should be set");
stack_size = JavaThread::stack_size_at_create();
break;
case os::compiler_thread:
if (CompilerThreadStackSize > 0) {
stack_size = (size_t)(CompilerThreadStackSize * K);
break;
} // else fall through:
// use VMThreadStackSize if CompilerThreadStackSize is not defined
case os::vm_thread:
case os::pgc_thread:
case os::cgc_thread:
case os::watcher_thread:
if (VMThreadStackSize > 0) stack_size = (size_t)(VMThreadStackSize * K);
break;
}
}

stack_size = MAX2(stack_size, os::Linux::min_stack_allowed);
pthread_attr_setstacksize(&attr, stack_size);
} else {
// let pthread_create() pick the default value.
}

// glibc guard page
pthread_attr_setguardsize(&attr, os::Linux::default_guard_size(thr_type));

ThreadState state;

{
// Serialize thread creation if we are running with fixed stack LinuxThreads
bool lock = os::Linux::is_LinuxThreads() && !os::Linux::is_floating_stack();
if (lock) {
os::Linux::createThread_lock()->lock_without_safepoint_check();
}

pthread_t tid;
//通过pthread_create方法创建内核级线程 !
int ret = pthread_create(&tid, &attr, (void* (*)(void*)) java_start, thread);

pthread_attr_destroy(&attr);

if (ret != 0) {
if (PrintMiscellaneous && (Verbose || WizardMode)) {
perror("pthread_create()");
}
// Need to clean up stuff we've allocated so far
thread->set_osthread(NULL);
delete osthread;
if (lock) os::Linux::createThread_lock()->unlock();
return false;
}

// Store pthread info into the OSThread
osthread->set_pthread_id(tid);

// Wait until child thread is either initialized or aborted
{
Monitor* sync_with_child = osthread->startThread_lock();
MutexLockerEx ml(sync_with_child, Mutex::_no_safepoint_check_flag);
while ((state = osthread->get_state()) == ALLOCATED) {
sync_with_child->wait(Mutex::_no_safepoint_check_flag);
}
}

if (lock) {
os::Linux::createThread_lock()->unlock();
}
}

// Aborted due to thread limit being reached
if (state == ZOMBIE) {
thread->set_osthread(NULL);
delete osthread;
return false;
}

// The thread is returned suspended (in state INITIALIZED),
// and is started higher up in the call chain
assert(state == INITIALIZED, "race condition");
return true;
}

源码见:https://hg.openjdk.java.net/jdk8u/jdk8u/hotspot/file/69087d08d473/src/os/linux/vm/os_linux.cpp

主要通过pthread_create(&tid, &attr, (void* (*)(void*)) java_start, thread),它是unix 创建线程的方法,linux也继承了。调用后在linux系统中会创建一个内核级的线程。也就是说这个时候操作系统中线程才真正地诞生

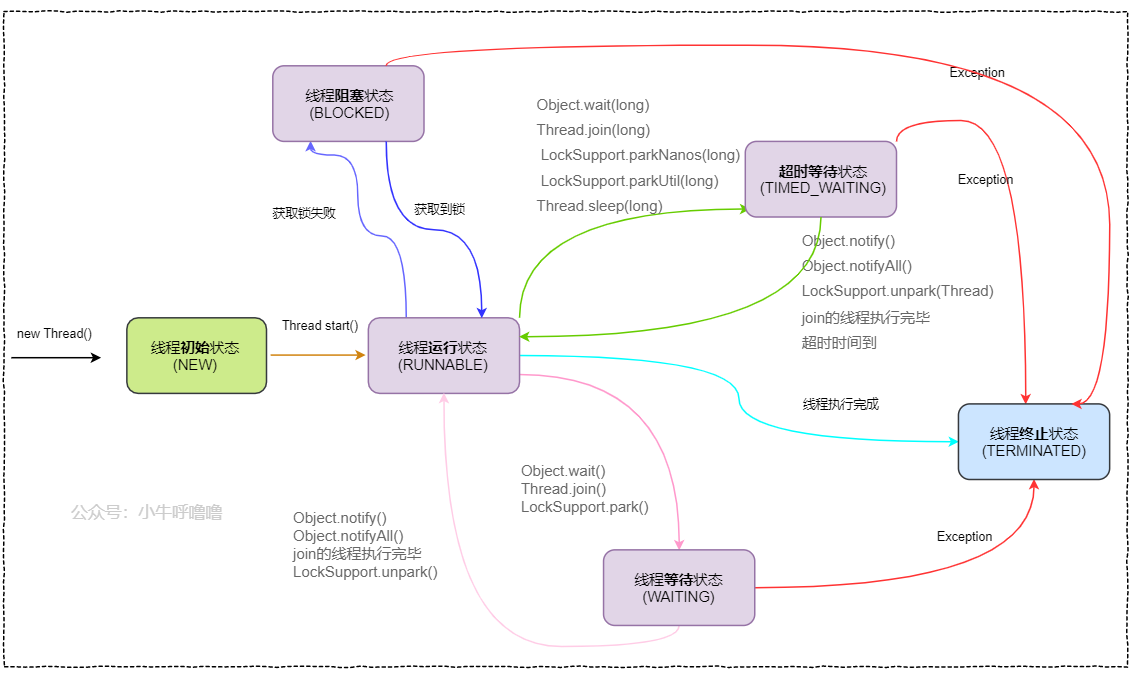
但此时线程才诞生,那是怎么启动的?我们回到JVM_StartThread源码中,Thread::start(native_thread)很明显这行代码就表示启动native_thread = new JavaThread(&thread_entry, sz)创建的线程,我们来继续看看其源码

1
2
3
4
5
6
7
8
9
10
11
12
13
void Thread::start(Thread* thread) {
trace("start", thread);
// Start is different from resume in that its safety is guaranteed by context or
// being called from a Java method synchronized on the Thread object.
if (!DisableStartThread) {
if (thread->is_Java_thread()) {
// 设置线程状态
java_lang_Thread::set_thread_status(((JavaThread*)thread)->threadObj(),
java_lang_Thread::RUNNABLE);
}
os::start_thread(thread);
}
}

源码:https://hg.openjdk.java.net/jdk8u/jdk8u/hotspot/file/69087d08d473/src/share/vm/runtime/thread.cpp

os::start_thread它封装了pd_start_thread(thread),执行该方法,操作系统会去启动指定的线程

1
2
3
4
5
6
7
void os::start_thread(Thread* thread) {
// guard suspend/resume
MutexLockerEx ml(thread->SR_lock(), Mutex::_no_safepoint_check_flag);
OSThread* osthread = thread->osthread();
osthread->set_state(RUNNABLE);
pd_start_thread(thread);
}

当操作系统的线程启动完之后,我们再回到pthread_create(&tid, &attr, (void* (*)(void*)) java_start, thread),会去java_start这个线程入口函数进行OS内核级线程的初始化,并开始启动JavaThread

1
2
3
4
5
6
7
8
9
10
11
12
13
14
15
16
17
18
19
20
21
22
23
24
25
26
27
28
29
30
31
32
33
34
35
36
37
38
39
40
41
42
43
44
45
46
47
48
49
50
51
52
53
54
55
56
57
58
59
// Thread start routine for all newly created threads
static void *java_start(Thread *thread) {
// Try to randomize the cache line index of hot stack frames.
// This helps when threads of the same stack traces evict each other's
// cache lines. The threads can be either from the same JVM instance, or
// from different JVM instances. The benefit is especially true for
// processors with hyperthreading technology.
static int counter = 0;
int pid = os::current_process_id();
alloca(((pid ^ counter++) & 7) * 128);

ThreadLocalStorage::set_thread(thread);

OSThread* osthread = thread->osthread();
Monitor* sync = osthread->startThread_lock();

// non floating stack LinuxThreads needs extra check, see above
if (!_thread_safety_check(thread)) {
// notify parent thread
MutexLockerEx ml(sync, Mutex::_no_safepoint_check_flag);
osthread->set_state(ZOMBIE);
sync->notify_all();
return NULL;
}

// thread_id is kernel thread id (similar to Solaris LWP id)
osthread->set_thread_id(os::Linux::gettid());

if (UseNUMA) {
int lgrp_id = os::numa_get_group_id();
if (lgrp_id != -1) {
thread->set_lgrp_id(lgrp_id);
}
}
// initialize signal mask for this thread
os::Linux::hotspot_sigmask(thread);

// initialize floating point control register
os::Linux::init_thread_fpu_state();

// handshaking with parent thread
{
MutexLockerEx ml(sync, Mutex::_no_safepoint_check_flag);

// notify parent thread
osthread->set_state(INITIALIZED);
sync->notify_all();

// 等待,直到操作系统级线程全部启动
while (osthread->get_state() == INITIALIZED) {
sync->wait(Mutex::_no_safepoint_check_flag);
}
}

// 开始运行JavaThread::run
thread->run();

return 0;
}

源码:https://hg.openjdk.java.net/jdk8u/jdk8u/hotspot/file/69087d08d473/src/os/linux/vm/os_linux.cpp

thread->run()其实就是JavaThread::run()也表明方法开始回调,从OS层方法回到JVM层方法
,我们再来看下其实现:

1
2
3
4
5
6
7
8
9
10
11
12
13
14
15
16
17
18
19
20
21
22
23
24
25
26
27
28
29
30
31
32
33
34
35
36
37
38
39
40
41
42
43
44
45
46
47
48
49
50
51
52
53
54
55
56
57
58
59
60
61
62
63
64
65
66
67
68
// The first routine called by a new Java thread
void JavaThread::run() {
// initialize thread-local alloc buffer related fields
this->initialize_tlab();

// used to test validitity of stack trace backs
this->record_base_of_stack_pointer();

// Record real stack base and size.
this->record_stack_base_and_size();

// Initialize thread local storage; set before calling MutexLocker
this->initialize_thread_local_storage();

this->create_stack_guard_pages();

this->cache_global_variables();

// Thread is now sufficient initialized to be handled by the safepoint code as being
// in the VM. Change thread state from _thread_new to _thread_in_vm
ThreadStateTransition::transition_and_fence(this, _thread_new, _thread_in_vm);

assert(JavaThread::current() == this, "sanity check");
assert(!Thread::current()->owns_locks(), "sanity check");

DTRACE_THREAD_PROBE(start, this);

// This operation might block. We call that after all safepoint checks for a new thread has
// been completed.
this->set_active_handles(JNIHandleBlock::allocate_block());

if (JvmtiExport::should_post_thread_life()) {
JvmtiExport::post_thread_start(this);
}

JFR_ONLY(Jfr::on_thread_start(this);)

// We call another function to do the rest so we are sure that the stack addresses used
// from there will be lower than the stack base just computed
thread_main_inner();//!!!注意此处方法

// Note, thread is no longer valid at this point!
}

void JavaThread::thread_main_inner() {
assert(JavaThread::current() == this, "sanity check");
assert(this->threadObj() != NULL, "just checking");

// Execute thread entry point unless this thread has a pending exception
// or has been stopped before starting.
// Note: Due to JVM_StopThread we can have pending exceptions already!
if (!this->has_pending_exception() &&
!java_lang_Thread::is_stillborn(this->threadObj())) {
{
ResourceMark rm(this);
this->set_native_thread_name(this->get_thread_name());
}
HandleMark hm(this);
this->entry_point()(this, this);//JavaThread对象中传入的entry_point为Thread对象的Thread::run方法
}

DTRACE_THREAD_PROBE(stop, this);

this->exit(false);
delete this;
}


源码:https://hg.openjdk.java.net/jdk8u/jdk8u/hotspot/file/69087d08d473/src/share/vm/runtime/thread.cpp
由于JavaThread定义可知JavaThread::JavaThread(ThreadFunction entry_point, size_t stack_sz)中参数entry_point是外部传入,那我们想想JavaThread是什么时候实例化的?
没错,就是我们一开始的JVM_StartThreadnative_thread = new JavaThread(&thread_entry, sz);
也就是说this->entry_point()(this, this)实际上是回调的thread_entry方法

thread_entry源码:

1
2
3
4
5
6
7
8
9
10
11
static void thread_entry(JavaThread* thread, TRAPS) {
HandleMark hm(THREAD);
Handle obj(THREAD, thread->threadObj());
JavaValue result(T_VOID);
JavaCalls::call_virtual(&result,
obj,
KlassHandle(THREAD, SystemDictionary::Thread_klass()),
vmSymbols::run_method_name(),
vmSymbols::void_method_signature(),
THREAD);
}

源码:https://hg.openjdk.java.net/jdk8u/jdk8u/hotspot/file/69087d08d473/src/share/vm/prims/jvm.cpp
通过JavaCalls::call_virtual方法,又从JVM层 回到了Java语言层 ,即MyThread thread = new MyThread(); thread.start();

一切又回到了起点,这就是Javathread.start()内部完整的一个流程,HotSpot虚拟机实现的Java线程其实是对Linux内核级线程的直接映射,将Java涉及到的所有线程调度、内存分配都交由操作系统进行管理

线程终止状态

线程终止状态(TERMINATED),表示该线程已经运行完毕。

当一个线程执行完毕,或者主线程的main()方法完成时,我们就认为它终止了。终止的线程无法在被使用,如果调用start()方法,会抛出java.lang.IllegalThreadStateException异常,这一点我们可以从start源码中很容易地得到

1
2
3
4
5
public synchronized void start() {
if (threadStatus != 0)
throw new IllegalThreadStateException();
...
}

线程阻塞状态

线程阻塞状态(BLOCKED),需要等待锁释放或者说获取锁失败时,线程阻塞

1
2
3
4
5
6
7
8
9
10
public class BlockedThread implements Runnable {
@Override
public void run() {
synchronized (BlockedThread.class){
while (true){

}
}
}
}

从Thread源码的注释中,我们可以知道等待锁释放或者说获取锁失败,主要有下面3中情况:

  1. 进入 synchronized 方法时
  2. 进入 synchronized 块时
  3. 调用 wait 后, 重新进入 synchronized 方法/块时

其中第三种情况,大家可以先思考一下,我们留在下文线程等待状态再详细展开

线程等待状态

线程等待状态(WAITING),表示该线程需要等待其他线程做出一些特定动作(通知或中断)。

wait/notify/notifyAll

我们紧接着上一小节,调用 wait 后, 重新进入synchronized 方法/块时,我们来看看期间发生了什么?

线程1调用对象A的wait方法后,会释放当前的锁,然后让出CPU时间片,线程会进入该对象的等待队列中,线程状态变为 等待状态WAITING
当另一个线程2调用了对象A的notify()/notifyAll()方法

notify()方法只会唤醒沉睡的线程,不会立即释放之前占有的对象A的锁,必须执行完notify()方法所在的synchronized代码块后才释放。所以在编程中,尽量在使用了notify/notifyAll()后立即退出临界区

线程1收到通知后退出等待队列,并进入线程运行状态RUNNABLE,等待 CPU 时间片分配, 进而执行后续操作,接着线程1重新进入 synchronized 方法/块时,竞争不到锁,线程状态变为线程阻塞状态BLOCKED。如果竞争到锁,就直接接着运行。线程等待状态 切换到线程阻塞状态,无法直接切换,需要经过线程运行状态。

我们再来看一个例子,巩固巩固:

1
2
3
4
5
6
7
8
9
10
11
12
13
14
15
16
17
18
19
20
21
22
23
24
25
26
27
28
29
30
31
32
33
34
35
36
37
38
39
40
public class WaitNotifyTest {
public static void main(String[] args) {
Object A = new Object();

new Thread(new Runnable() {
@Override
public void run() {
System.out.println("线程1等待获取 对象A的锁...");
synchronized (A) {
try {
System.out.println("线程1获取了 对象A的锁");
Thread.sleep(3000);
System.out.println("线程1开始运行wait()方法进行等待,进入到等待队列......");
A.wait();
System.out.println("线程1等待结束");
} catch (InterruptedException e) {
e.printStackTrace();
}
}
}
}).start();

new Thread(new Runnable() {
@Override
public void run() {
System.out.println("线程2等待获取 对象A的锁...");
synchronized (A) {
System.out.println("线程2获取了 对象A的锁");
try {
Thread.sleep(3000);
} catch (InterruptedException e) {
e.printStackTrace();
}
System.out.println("线程2将要运行notify()方法进行唤醒线程1");
A.notify();
}
}
}).start();
}
}

结果:

1
2
3
4
5
6
7
线程1等待获取 对象A的锁...
线程1获取了 对象A的锁
线程2等待获取 对象A的锁...
线程1开始运行wait()方法进行等待,进入到等待队列......
线程2获取了 对象A的锁
线程2将要运行notify()方法进行唤醒线程1
线程1等待结束

需要注意的是,wait/notify/notifyAll 只能在synchronized修饰的方法、块中使用notify 是只随机唤醒一个线程,而 notifyAll 是唤醒所有等待队列中的线程

join

Thread类中的join方法的主要作用能让线程之间的并行执行变为串行执行,当前线程等该加入该线程后面,等待该线程终止

1
2
3
4
5
6
public static void main(String[] args) {
Thread thread = new Thread();
thread.start();
thread.join();
...
}

上面一个例子表示,程序在main主线程中调用thread线程的join方法,意味着main线程放弃CPU时间片(主线程会变成 WAITING 状态),并返回thread线程,继续执行直到线程thread执行完毕,换句话说在主线程执行过程中,插入thread线程,还得等thread线程执行完后,才轮到主线程继续执行

如果查看JDKthread.join()底层实现,会发现其实内部封装了wait(),notifyAll()

park/unpark

LockSupport.park() 挂起当前线程;LockSupport.unpark(暂停线程对象) 恢复某个线程

1
2
3
4
5
6
7
8
9
10
11
12
13
14
15
16
17
18
19
20
21
22
23
24
25
26
27
28
29
package com.zj.ideaprojects.demo.test3;

import java.util.concurrent.Executors;
import java.util.concurrent.locks.LockSupport;

public class ThreadLockSupportTest {

public static void main(String[] args) throws InterruptedException {
Thread thread = new Thread(() -> {
System.out.println("start.....");
try {
Thread.sleep(1000);
} catch (InterruptedException e) {
e.printStackTrace();
}
System.out.println("park....");
LockSupport.park();
System.out.println("resume.....");

});
thread.start();
Thread.sleep(3000);
System.out.println("unpark....");
LockSupport.unpark(thread);

}
}


结果:

1
2
3
4
start.....
park....
unpark....
resume.....

当程序调用LockSupport.park(),会让当前线程A的线程状态会从 RUNNABLE 变成 WAITING,然后main主线程调用LockSupport.unpark(thread),让指定的线程即线程A,从 WAITING 回到 RUNNABLE 。我们可以发现
park/unparkwait/notify/notifyAll很像,但是他们有以下的区别:

  1. wait,notify 和 notifyAll 必须事先获取对象锁,而 unpark 不必
  2. park、unpark 可以先 unpark ,而 wait、notify 不能先 notify,必须先wait
  3. unpark 可以精准唤醒某一个确定的线程。而 notify 只能随机唤醒一个等待线程,notifyAll 是唤醒所以等待线程,就不那么精确

超时等待状态

超时等待状态(TIMED_WAITING),也叫限期等待,可以在指定的时间后自行返回而不是像 WAITING 那样一直等待。

这部分比较简单,它和线程等待状态(WAITING)状态 非常相似,区别就是方法的参数舒服传入限制时间,在 Timed Waiting状态时会等待超时,之后由系统唤醒,或者也可以提前被通知唤醒如 notify

相关方法主要有:

1
2
3
4
5
1. Object.wait(long)
2. Thread.join(long)
3. LockSupport.parkNanos(long)
4. LockSupport.parkUntil(long)
5. Thread.sleep(long)

需要注意的是Thread.sleep(long),当线程执行sleep方法时,不会释放当前的锁(如果当前线程进入了同步锁),也不会让出CPU。sleep(long)可以用指定时间使它自动唤醒过来,如果时间不到只能调用interrupt方法强行打断。

参考资料:
https://hg.openjdk.java.net/jdk8u
《并发编程的艺术》
https://www.jianshu.com/p/216a41352fd8


本篇文章到这里就结束啦,很感谢靓仔你能看到最后,如果觉得文章对你有帮助,别忘记关注我!更多精彩的文章